¶ Lapped seams are thicker than abutted seams-and a thick seam is necessarily not as flat as a thin seam. The Flatlock seam forms a perfect union between two abutted cut edges. There is only one thickness of the garment throughout forming a flat seam.
¶ Lapped seams form two ridges where the second thickness begins and ends. The Flatlock seam – an abutted seam – eliminates this. It is flat, as fiat as the single thickness of the garment will allow. A feature of the Flatlock machine which is of particular interest to manufacturers is the fact that it does not take up any more room than the ordinary machines, production can go on while installations are being made, and, for the same pro- duction, fewer operators are required.
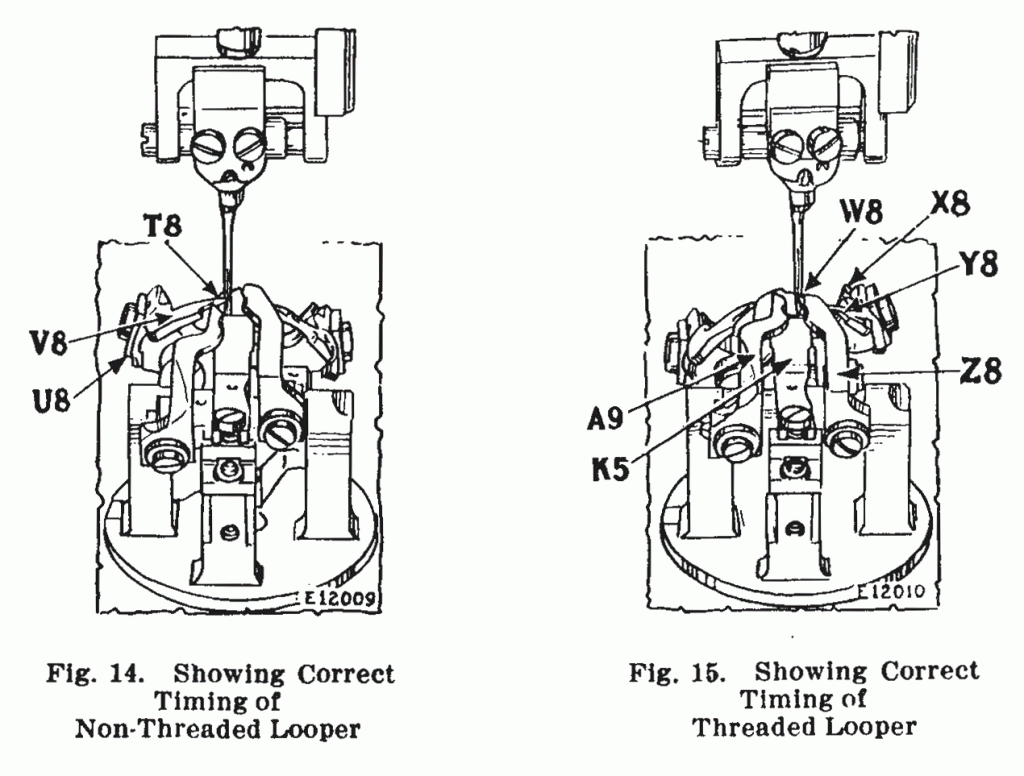
¶ When replacing loopers, first remove work clamp plates and throat plate (12, Fig. 4), then place wrench on pattern wheel clamping nut(S5, Fig. 9) and turn until stop lever operating plate(Z5, Fig. 9) rides on the pattern wheel ring(R5, Fig. 9), allowing the machine to be turned by hand. ¶Place non-threaded looper(V8, Fig. 14) on seat of looper rocker(U8, Fig. 14) and turn machine until the needle bar, after descending to its lowest point, has risen so that the lower timing mark on needle bar is even with top of top needle bar bushing, and the point of the non-threaded looper has advanced to center of the needle. ¶ At this position, the point of the non-threaded looper should be adjusted to centre of needle, as shown at T8 in Fig. 14, and ad- justed sidewise so that it just clears the needle.
To Adjust the Needle Guard
¶ The needle guard (K5, Fig. 15) should be set as close as possible to the needle without deflecting it. To set the needle guard in the correct position, loosen its two screws and move the needle guard forward or backward, as required, then securely tighten the two screws.
To Replace and Time Threaded Looper
¶ Turn hand wheel over until looper (Y8, Fig. 15) can be in- serted on looper rocker seat (X8, Fig. 15), then turn machine until the needle bar, after descending to its lowest point has risen so that the lower timing mark on needle bar is even with top of top needle bar bushing and the point of the threaded looper has advanced to the centre of the needle. ¶ At this position, the looper point should be adjusted to centre of needle, as shown at W8 in Fig. 15, and adjusted sidewise so that it just clears the needle.
To Replace and Adjust Right Hand Loop Retainer
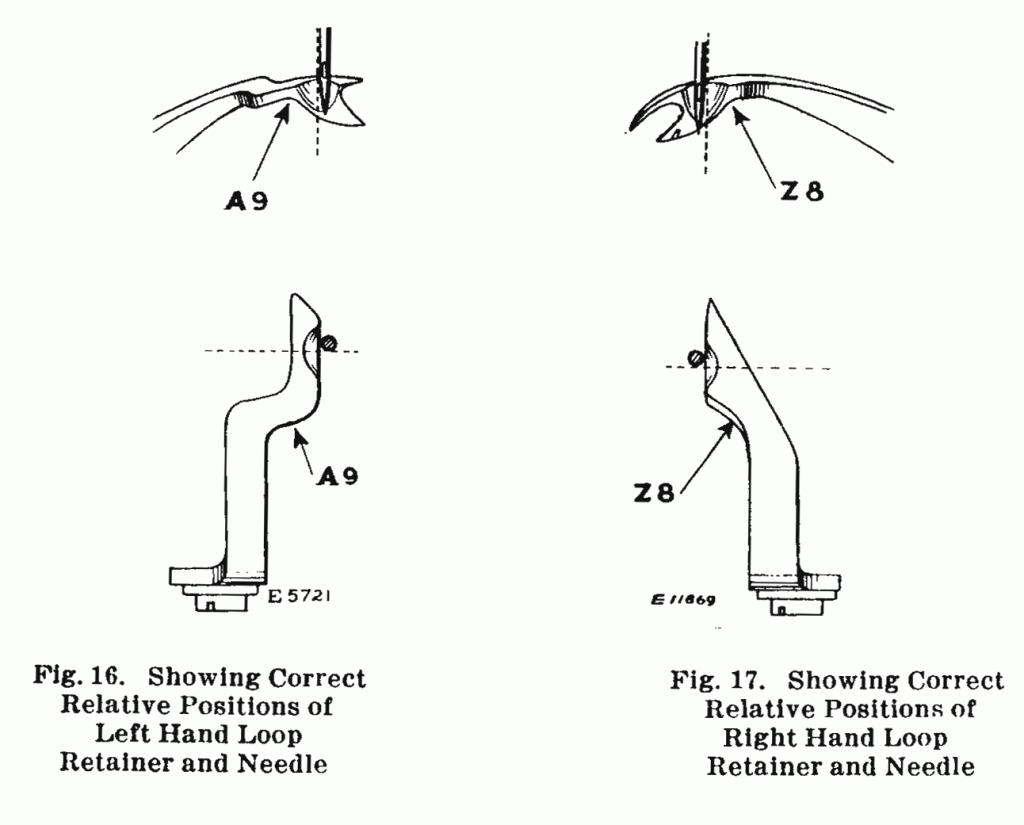
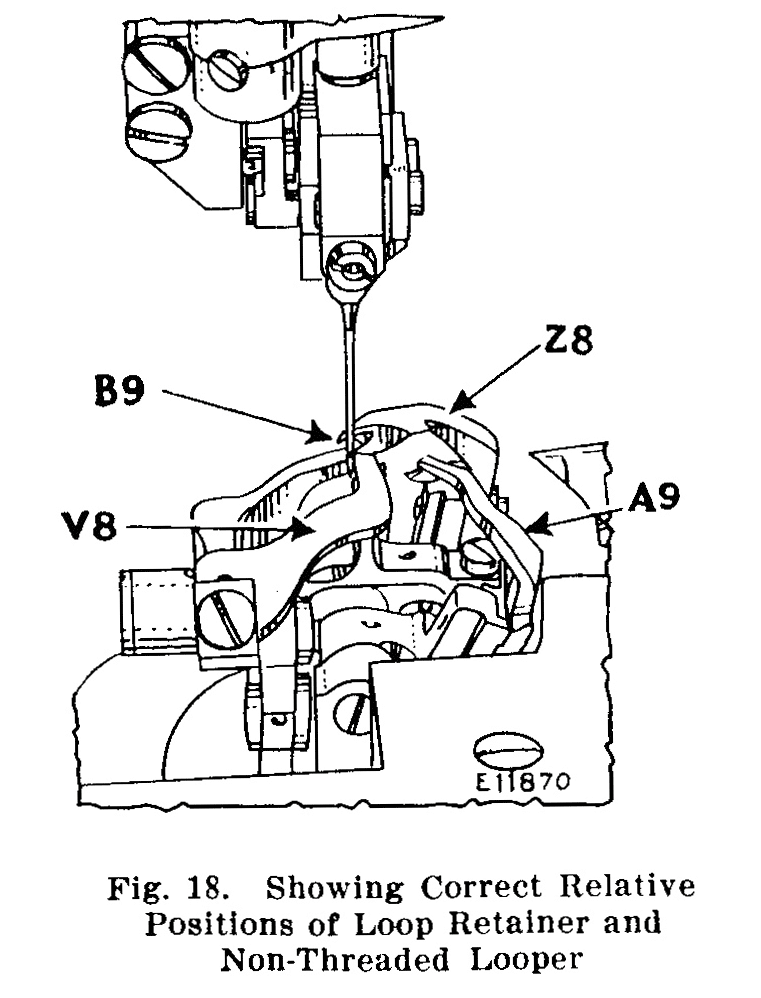
¶ It is first advisable to adjust the right hand loop retainer (Z8, Figs. 15 and 17). ¶ The right hand loop retainer should be set in height so that it just clears the threaded and non-threaded loopers, or so that there is sufficient space between the top side of the looper and underside of the loop retainer for the thread being used to pass through. ¶ The loop retainer should also be adjusted sidewise so that, as the needle descends, the loop retainer just clears the needle on the side as the loop retainer is retreating as shown in Fig. 17, which shows a side and top view of the loop retainer correctly adjusted. ¶ The right hand loop retainer should be adjusted forward or back so that the needle in descending will penetrate the loop held suspended on its horn in such a position that the right hand loop retainer point does not project over the further edge of the non-threaded looper thus to prevent the point striking or dragging against the further side of the loop held upon the non-threaded looper, as shown in Fig. 18. ¶ The loop retainers (28 and A9, Fig. 18) should be set so that when they are forward in loop holding position, they will hold the loop in such a way that when the needle descends it will enter centrally in the loop.
To Replace and Adjust Left Hand Loop Retainer
¶ To replace and adjust left hand loop retainer(A9, Fig. 18), first obtain about the proper amount of bight required by the needle as instructed. ¶ This loop retainer should be set in height so that there is just sufficient space between the top side of the threaded looper and the underside of the loop retainer for the thread to pass through. It should also be adjusted side- wise so that, as the needle descends, it just clears it on the side, as shown in Fig. 16, which shows a side and top view of the left hand loop retainer correctly adjusted. ¶ The left hand loop retainer should be adjusted forward or back so that the needle in descend- ing will penetrate the loop held suspended on its horn and in such a position that the point of the left hand loop retainer will clear the thread held between the work and the eye in the extreme end of the threaded looper as the threaded looper and left hand loop retainer pass each other. ¶ It may be necessary, in order to obtain correct setting for either the left or right loop retainer, to use shims which are made in different thicknesses, viz., 250074, .005″ thick, 250449, .010″ thick, 250450, .020″ thick and 250537, .030″ thick.
To Replace and Adjust the Throat Plate
¶ When replacing the throat plate (12, Fig. 4), see that its underside just clears the loop retainers and the top set about .025″ below the top of the clamp plates. ¶ The throat plate should be adjusted sidewise so that the needle just clears the cord or range of opening in the throat plate but not so as to allow the loop retainer to rub against the rib of the throat plate.
To Remove and Replace the Looper Frame
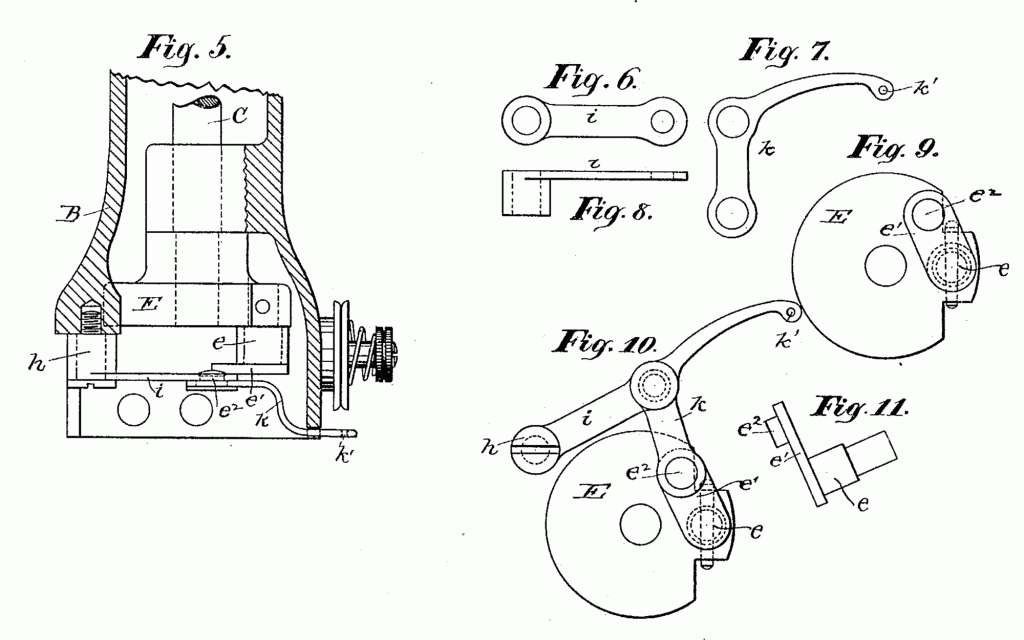
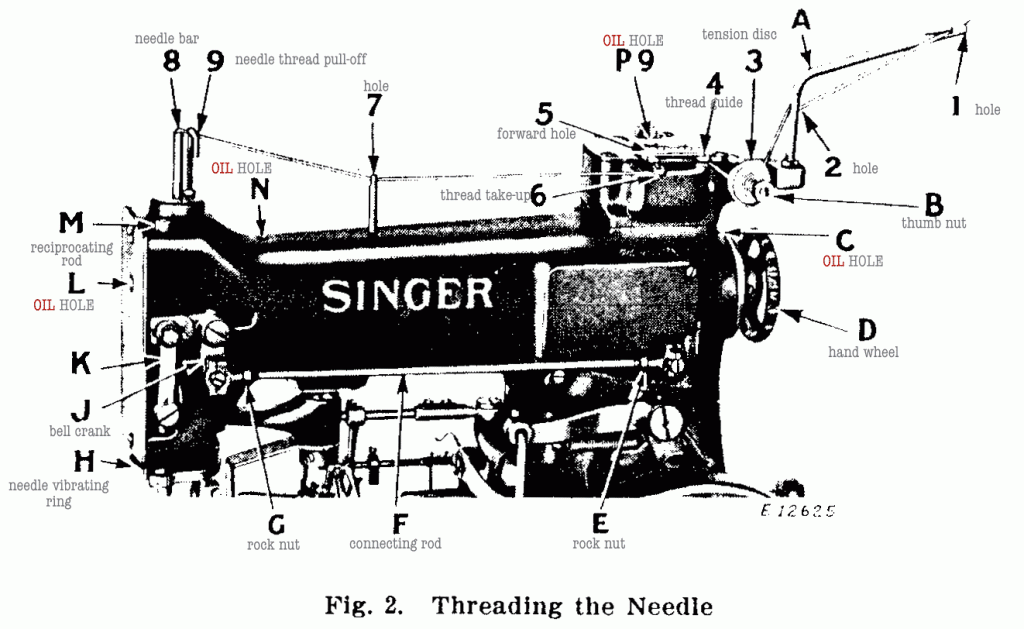
¶ Press in the buttons(S3 and U3, Fig. 6) and at the same time draw the bed end cover (T3, Fig. 6) toward you to remove it from the machine, then turn the looper thread tension releaser(X, Fig. 3) up to clear the right hand edge of the looper frame (W, Fig. 3). ¶ See that the sewing mechanism is in stopping position with the interlocking slide (J7, Fig. 10) locked in the notch of the stop cam (H7, Fig. 10). ¶ Follow the instructions under the head “Caution”, page 60 and ratchet the machine about half way up the first side of the buttonhole, remove the link screw(L2, Fig. 3) and the three looper frame screws, replace link screw (L2) temporarily, to retain the setting of the loopers, and care- fully withdraw the looper frame(W) from the machine. To replace the looper frame (W) make sure that the machine is in the same position as referred to in the preceding paragraph with the needle bar gauge plate (R7, Fig. 12) turned towards the rear of the machine. ¶ Turn the stitch forming mechanism in the looper frame (W) so that the post for the throat plate (12, Fig. 4) is to the front, set the looper driving crank(D2, Fig. 3) with the “hole(E2, Fig. 3) in the flange of crank to the left and slightly below the horizontal position. ¶ Carefully guide the rear edge of the chip guard(Q. Fig. 3) between the underside of the lower cutting lever and the top face of the feed wheel, and as the looper frame(W) is gently pushed to the rear, guide it so that its position pins enter the two pin holes and so the fork end of the loop retainer slide(B2, Fig. 3) enters the space between the two adjusting nuts (A2 and C2, Fig. 3) which are locked in posi- tion on the loop retainer driving bar (8, Fig. 3). ¶ At the same time slightly turn the looper driving crank (D2, Fig. 3) back and forth until the driving rollers on the forward end of the bed shaft enter the intermittent wheel which is attached to the rear side of the looper frame (W) and at the same time gently rotate the looper frame back and forth a slight amount so that the rotating gear on looper bracket will go into proper mesh with the lower stitch rotating sector and bring the looper mechanism in align- ment with the needle bar. Push the looper frame snug against its seat on the machine, then again remove the link screw (L2, Fig. 3) and replace the three clamping screws and the link screw (L2). (Always make sure the looper frame (W) is snug and square against its seat before tightening the three screws.) ¶ Then ratchet the machine to starting position as instructed on page 60.
Alignment of the Needle and Looper Frame
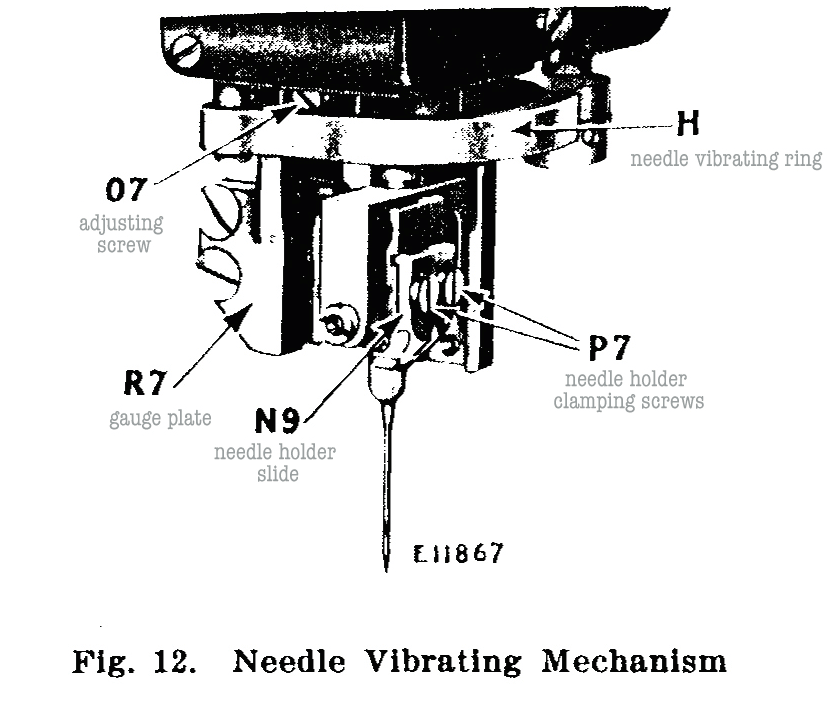
¶ The looper frame(W, Fig. 3) and the needle are aligned be- fore the machine is shipped so that the looper mechanism and the needle, at all points of rotation, are in perfect alignment; that is, the looper frame seat on the frame itself and the machine bed are filed and scraped to adjust the looper mechanism just the right amount in the direction of longitudinal travel and revolved on its seat to adjust it at right angles to the travel of the machine, so that when the machine is in the position where the needle is alongside of either of the loopers or the loop retainers, there will be no change in their relative position during this rotation. ¶ When the looper frame is so located, it is doweled in this position and with ordinary care in the handling of the machine, this posi- tion should be maintained. ¶ For this reason the looper frame should always be replaced upon its own machine according to the identification number. If a new looper frame should be fitted to the bed of the machine, it will be necessary that the looper frame be fitted very carefully and in a like manner. ¶ Should the bed shaft, the loop retainer cam or the looper driving crank be replaced, retiming of the looper mechanism will be necessary; but before this can be correctly done a check should be made as to the alignment of the needle and the looper frame, during the rotation of the looper mechanism and needle bar. ¶ The straightness of the needle bar should be ascertained and corrected if necessary. Remove the upper rear hinge screw for the stitch rotating connection so that the needle mechanism can be manually rotated. ¶ Then select a new needle and inspect the trueness of its point by rolling it on its shank on a flat surface. ¶ Remove the needle holder and clean off any burrs or dirt which would tip the needle holder on its seat, then replace the needle. holder in position, as shown at N9, Fig. 12 (see description “To Align the Needle”) and insert the inspected needle. ¶ Now firmly hold a piece of paper under the point of the needle and make a slight impression with the needle point, then revolve the needle bar and note whether the point revolves without describing a circle. ¶ Should the needle point describe a circle, it will indicate that either the needle is still bent or that the seat of the needle holder is throwing the needle point. ¶ This incorrect condition should be thoroughly corrected as the needle point will be the foundation upon which the looper mechanism will be aligned and timed. After correcting the alignment of the needle point, assemble the upper rotating sector so that when the machine is on the last side of the buttonhole, the needle bar gauge plate (R7, Fig. 12) is exactly positioned squarely to the front and the screw hole on the rear end of the upper stitch rotating con- nection is directly over the hole on the end of the upper stitch rotating lever, then assemble the hinge screw. ¶ Note that the identification number on the looper bracket frame (W, Fig. 3) agrees with the number on the front edge of the machine bed, then turn the hand wheel(D, Fig. 2) until the needle moves down alongside of the threaded looper and adjust so that it just touches the blade of the needle. ¶ Ratchet the machine to the eye end of the buttonhole and note the relation between the needle and side of the threaded looper as they both revolve. ¶ The rela- tive position of each should be maintained during the rotation but should they crowd together or gap open, it will indicate that the looper bracket frame is not correctly seated upon the machine. ¶ This condition should be corrected by removing all burrs and dirt from the seats and the dowel pin holes of the looper bracket frame and the machine bed until no further crawl is noted be- tween the threaded looper and the needle. ¶ As the machine is on either the first or last side of the buttonhole a greater per- centage of time, the looper frame position is vital to the loopers longitudinally and to the loop retainers laterally.
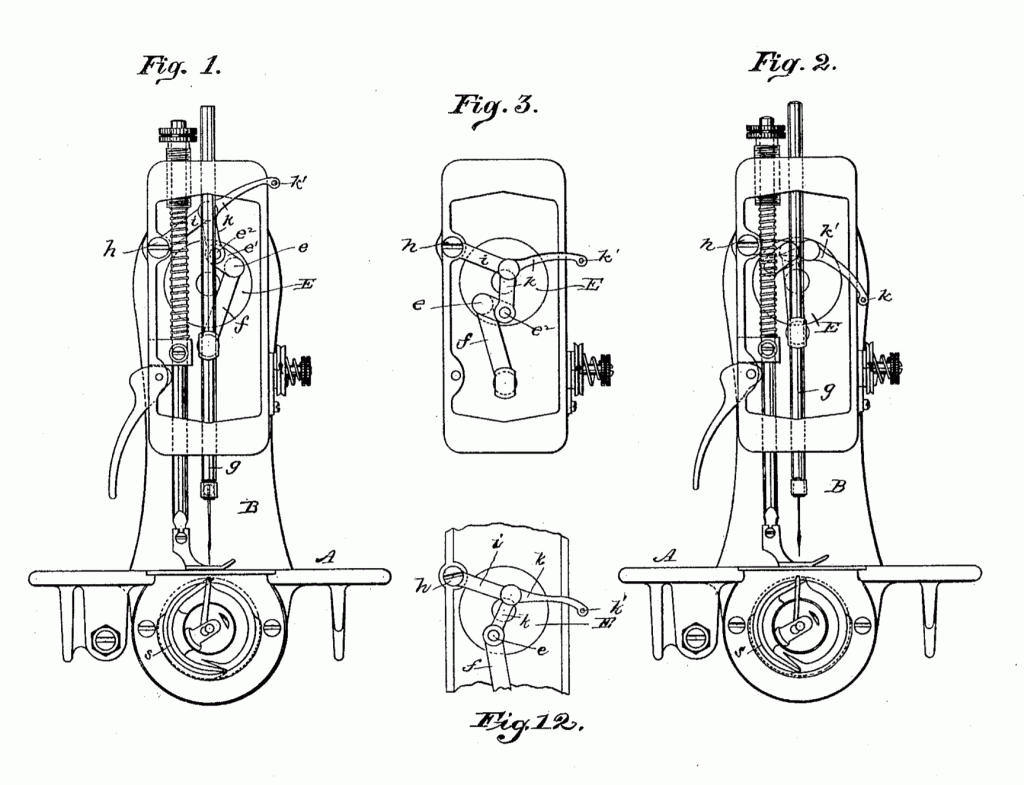
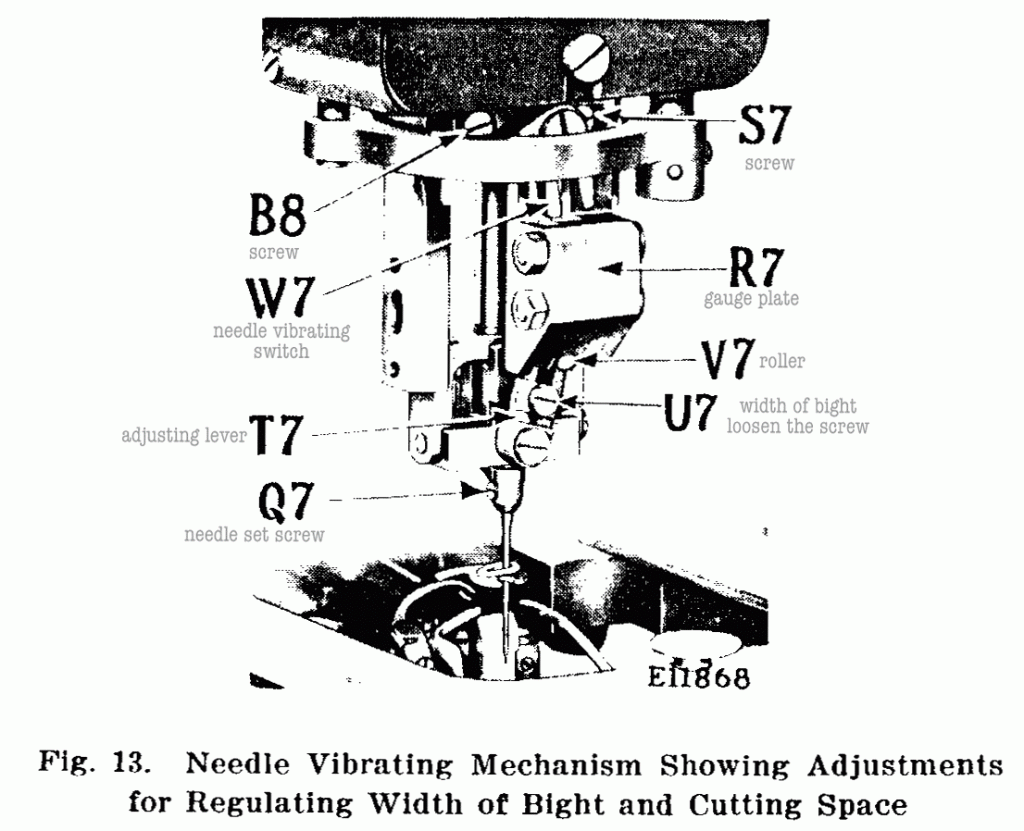
¶ The needle vibrating mechanism is actuated by means of a cam on the upright shaft. When this shaft starts to rotate, the cam moves the connecting rod (F, Fig. 2) back and forth, causing it to rock the bell crank (J, Fig. 2) which in turn moves the link(K, Fig. 2) up and down, carrying with it the reciprocating rod (M, Fig. 2) which has the vibrating ring(H, Figs. 2 and 12) attached to its lower end. ¶ As the vibrating ring moves up and down, it swings the needle vibrating switch(W7, Fig. 13) side- ways, causing the roller(V7, Fig. 13) to be switched from one groove to the other in the gauge plate(R7, Fig. 13). The roller(V7) is mounted upon the needle bight adjusting lever (T7, Fig. 13) which in turn is mounted on the bridge of the needle bar so that when the roller is switched in the grooves of the gauge plate (R7), the needle is vibrated from side to side.
To Align the Needle
¶ To ascertain the alignment of the needle, loosen the needle holder clamping screws(P7, Fig. 12) and slide the needle holder so that the left hand edge is flush with the corresponding edge of the needle holder slide, as shown at N9 in Fig. 12, and tighten the screws. ¶ Now clamp a piece of light card under the clamp checks, raise the work clamp carrier side throw lever lock pin(B6, Fig. 9) up and out of the pattern wheel (U5, Fig. 9) and then with wrench on pattern wheel clamping nut(S5, Fig. 9), turn the machine up the first side of buttonhole, at the same time making a row of light punctures in the card with the needle on the slit or central vibration. ¶ Continue up and around the eye. ¶ The needle point, while coming down the last side of the button- hole, should exactly enter the card in the first line of punctures. If the two lines do not coincide, it will be necessary to adjust the gauge plate (R7, Fig. 13) to the right or left as may be required. ¶ While the machine is still on the last side of the buttonhole with the gauge plate (R7) towards you, move the needle vibrat- ing ring (H, Fig. 12) to its lowest point, then loosen the two screws (S7 and B8, Fig. 13) and turn the adjusting screw (07, Fig. 12) to bring the two lines of needle punctures in line with each other, then tighten the two screws (S7 and B8). ¶ Turn the machine by hand and note the movement of the roller(V7, Fig. 13) as it passes from the slot of the gauge plate (R7) into the needle vibrating switch (W7, Fig. 13) and then from the switch (W7) back into the second slot of the gauge plate(R7). ¶ Should the roller drag upon the side wall of the gauge plate or switch, it will be necessary to change the length of the rod (F, Fig. 2). ¶ After making adjustments of the rod(F), the lock nuts (E and G, Fig. 2) should be tightened. ¶ After making the above adjustments, turn the machine with the wrench on the pattern wheel clamping nut (S5, Fig. 9) to the starting position as referred to under “Caution” on page 60.
To Regulate the Cutting Space
¶ Having followed the instruction for aligning the needle, again clamp a piece of light card under the clamp checks, raise the work clamp carrier side throw lever lock pin(B6, Fig. 9) up and out of the pattern wheel (U5, Fig. 9) and then with wrench on pattern wheel clamping nut (S5, Fig. 9), turn the machine up the first side of the buttonhole, at the same time making a row of light punctures in the card with the needle on the slit or central vibration. ¶ While on the first side of the buttonhole, loosen the needle holder clamping screws (P7, Fig. 12) and slightly adjust the needle holder to the left. ¶ The needle, while coming down the last side of the buttonhole, should enter the card about .006 inch to the right of the first line of punctures. ¶ This distance may have to be changed according to the thickness and textures of the material being sewn, as the heavier grades of materials require more cutting space than the lighter fabrics and, therefore, a greater distance between the two parallel lines of needle punctures may be required.
To Regulate the Width of Bight.
¶ The width of bight or stitch is regulated by the screw(U7, Fig. 13). To increase the width of bight or stitch, loosen the screw(U7) and move it upwardly. To decrease the width of bight, loosen the screw (U7) and move it downwardly. ¶ When changing the width of bight or lateral throw of the needle, it will be necessary to adjust the loop retainer(A9, Fig. 15) and the non-threaded looper (V8, Fig. 14), as instructed on pages TO REPLACE AND TIME NON-THREADED LOOPER and LOOP RETAINERS.