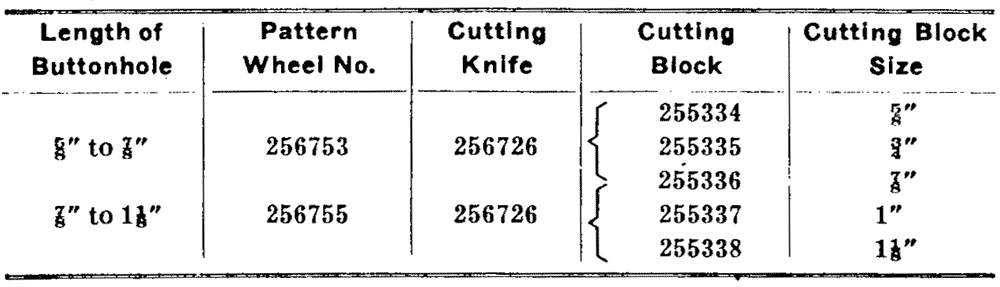
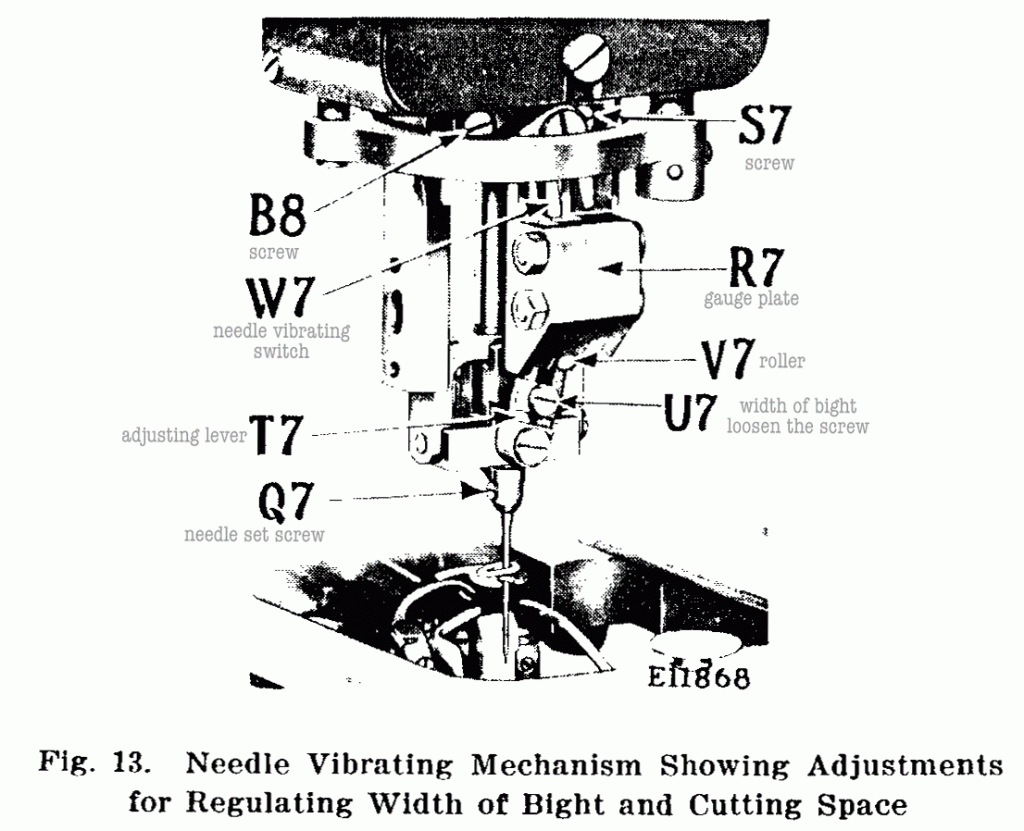
SINGER 99W SET UP

To Set the Needle

¶ Loosen the set screw (Q7, Fig. 13) in the needle clamp and put the needle up into the clamp as far as it will go with its long groove to the rear and its eye parallel or in line with the bed of the machine, then firmly tighten the set screw (Q7,Fig 13).

Fig 13 Needle Vibrating Mechanism

To Thread the Needle

¶ Pass the thread from the unwinder down through the hole (1, Fig. 2)❶ in the upper end of the needle thread leader, through the hole (2, Fig. 2) in the lower end of the needle thread leader, from back to front under between the tension discs (3, Fig. 2)❸,

Fig. 2. Threading the Needle

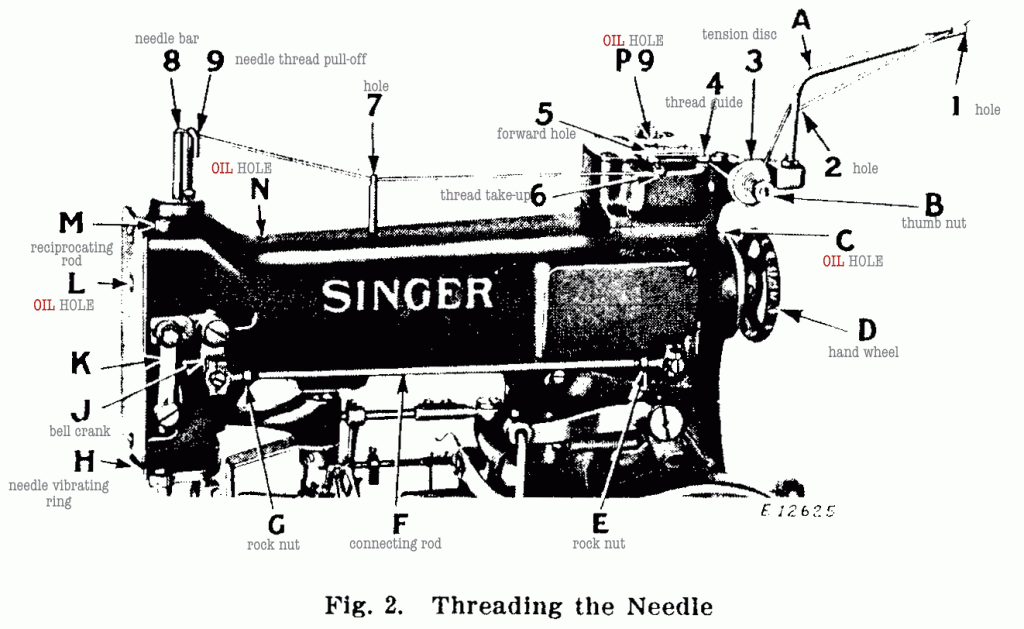
up through the slotted hole in the take-up thread guide (4, Fig. 2)❹, down through the forward hole (5, Fig. 2)❺, down through the hole in the end of the thread take-up (6, Fig. 2)❻, through the hole (7, Fig. 2)❼ in the top of the needle thread guide pin, under the needle thread pull-off (adjustable) (9, Fig. 2)❽ and down through the hollow needle bar (8, Fig. 2)❾ (inserting the thread- ing wire furnished with the machine up into the needle bar from below to pull the thread through), pass the thread from back to front or toward you through the eye of the needle, as shown in Fig. 6.

Note: ¶ When it is necessary to place the thread unwinder at the side of the machine, the needle thread leader (1, Fig. 2) at the top of the machine should be turned in the direction of the unwinder and the thread should be passed through the hole (A, Fig. 2) instead of the hole (2, Fig. 2).

To Thread the Looper

Fig 6 Threading of Machine Completed

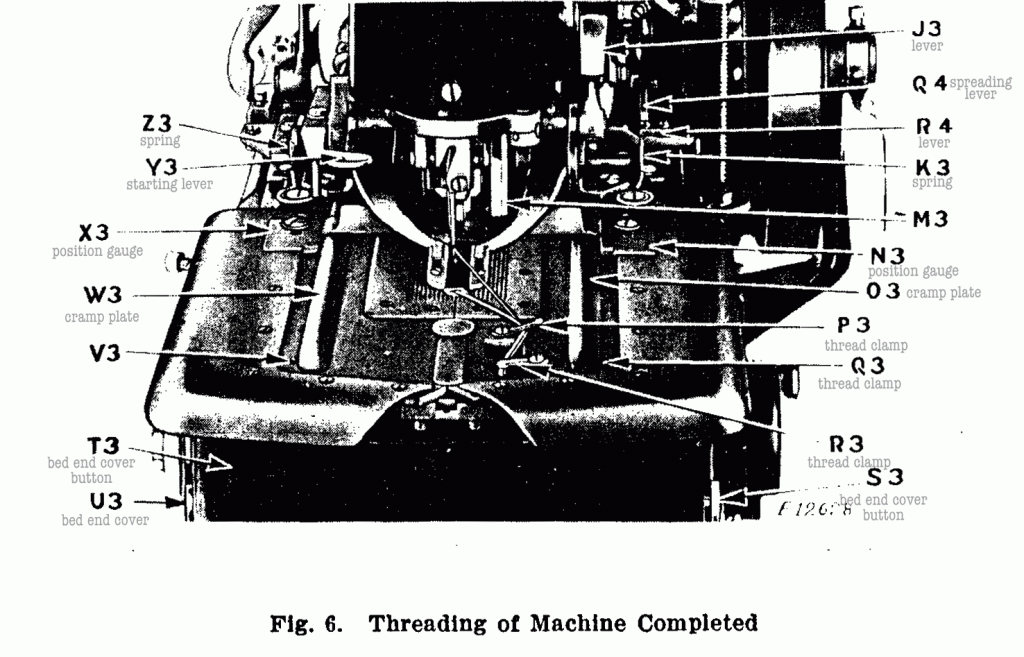
¶ Unhook the two springs (K3 and Z3, Fig. 6) and swing out the two work clamp plates (O3 and W3, Fig. 6), then press in the buttons (S3 and U3, Fig. 6) and at the same time draw the bed end cover (T3, Fig. 6) toward you to remove it from the machine.

Fig. 3.Threading the Looper Also Showing Threading the Cord

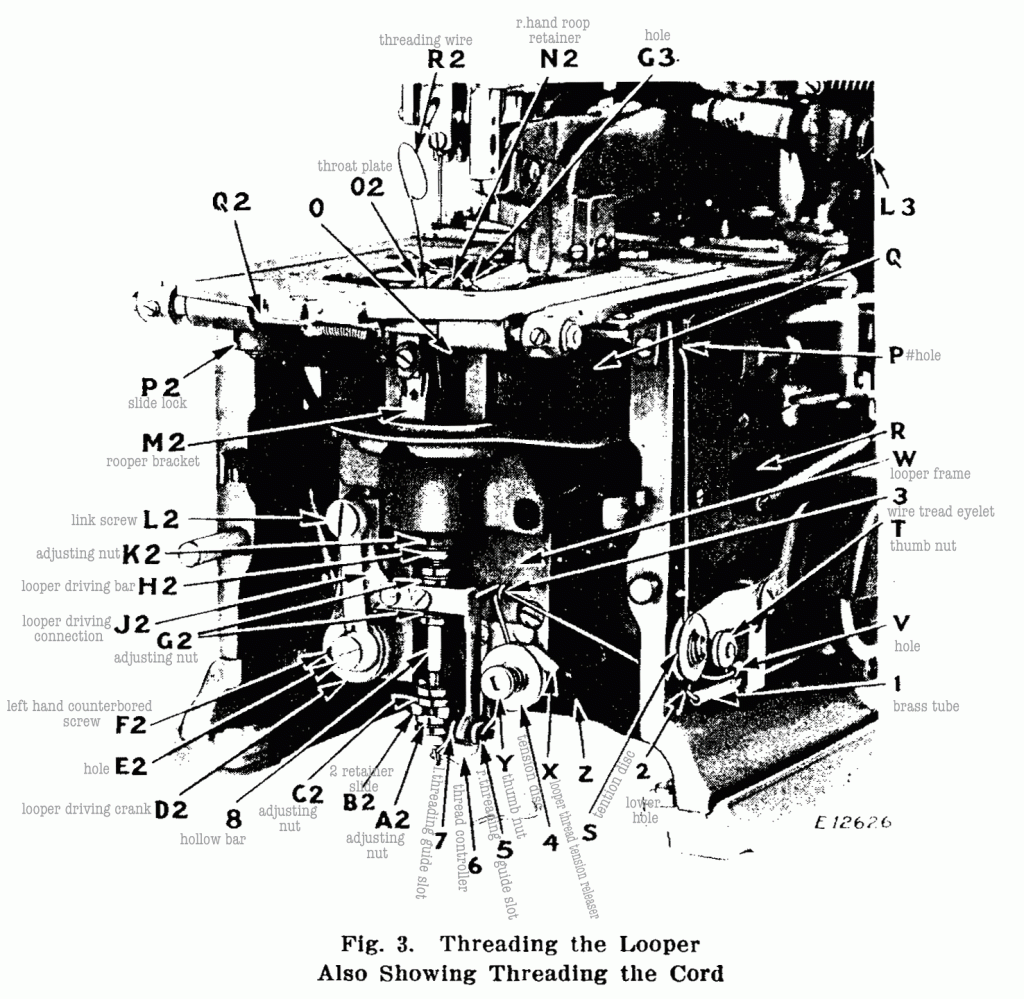
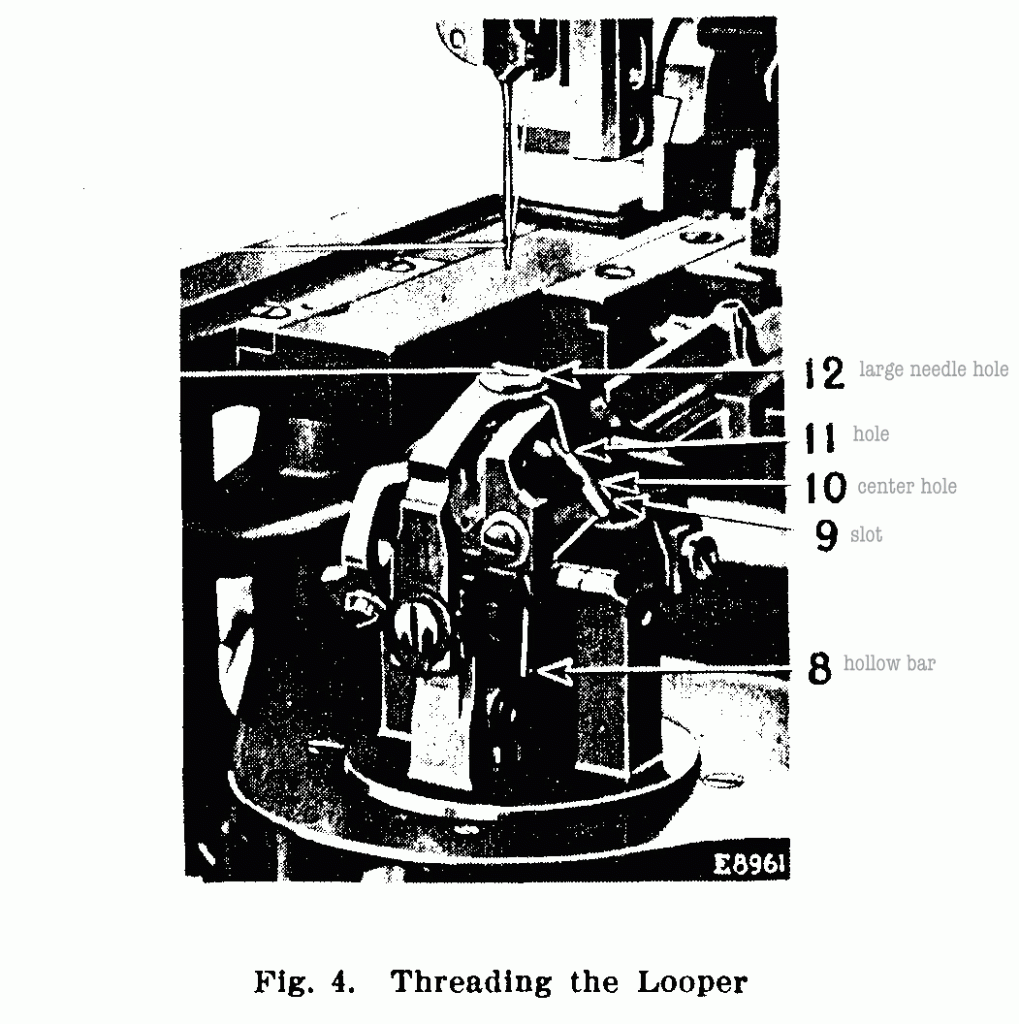
¶ Pass the thread from the unwinder through the lower brass tube (1, Figs. 3 and 10)❶ which is attached to the right side of the bed of the machine (using the threading wire furnished for the purpose), then through the lower hole (2, Fig. 3)❷ in the bed of the machine at the front of the brass tube, through the wire thread eyelet (3, Fig. 3)❸, down, under and from right to left between the tension discs (4, Fig. 3)❹, from right to left through the right hand self-threading guide slot (5, Fig. 3)❺ in the thread controller bracket, through the slot in the thread controller (6, Fig. 3)❻ and through the left hand self-threading guide slot (7, Fig. 3)❼ in the thread controller bracket. Pass the threading wire (R2, Fig. 3) between the throat plate (O2, Fig. 3)❽ and right hand loop retainer (N2, Fig. 3)❾ down through the hollow loop retainer driving bar (8, Figs. 3 and 4). Hook the thread on the end of the wire and draw it up through the hollow bar (8, Figs. 3 and 4), then, using the tweezers furnished for the purpose, pass the thread from the hollow bar (8)① up through the slot (9, Fig. 4) ②in the heel of the looper, as illustrated in Fig. 4, down through the centre hole (10, Fig. 4) ③ in the looper and up through the hole (11, Fig. 4)④ in the point of the looper, then up through the large needle hole (12, Fig. 4)⑤ in the throat plate.
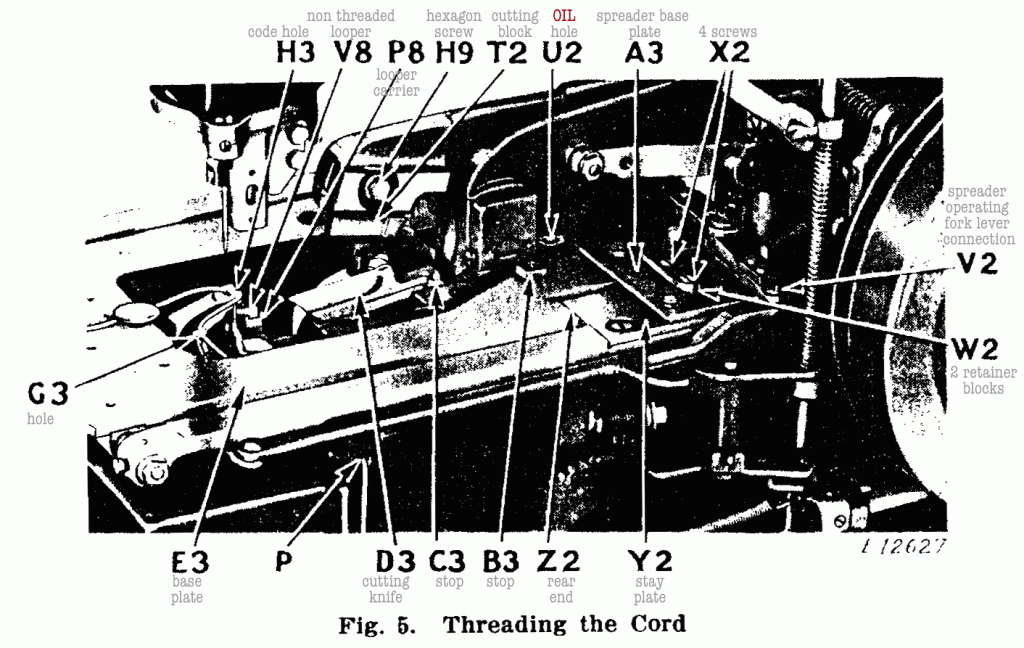
Fig. 4. Threading the Looper

To Thread the Cord

¶ The work clamp plates having been swung outward and the bed end cover removed, pass the cord from the unwinder through the upper brass tube (V, Figs. 3 and 10)❶ which is attached to the right side of the bed of the machine (using the threading wire furnished for the purpose), then pass the cord under and between the tension discs (S, Fig. 3)❷ adjacent to the cord tube, through the hole (P, Figs. 3 and 5) ❸ in the right hand side of the bed of the machine, up through the hole (G3, Fig. 5) ❹ in the cord controlling spring, thence from back to front through the cord hole (H3, Fig. 5) ❺ near the center of the throat plate, the cord leading toward the operator as shown in Fig. 5. ¶ Then swing the work clamp plates back into place and hook the springs (K3 and Z3, Fig. 6) ❻ to hold the plates in position. ¶ Also replace the bed end cover, then clamp the ends of the cord and looper thread in the thread clamps (P3 and R3, Fig. 6)❼.

Fig. 5. Threading the Cord

INDEX

SINGER 99W132 DESCRIPTION -INST

EXTRA LONG TRAVEL MACHINE

Machine 99w132 (extra long travel) has a capacity to sew 3/4″ to 2″ and cuts straight end buttonholes or eyelet-end buttonholes with large or medium eye without bar 3/4″ to 1-31/32″ and cuts straight end buttonholes or eyelet-end buttonholes with large or medium eye with taper bar 3/4″ to 1-3/4″, the bar being adjustable from 1/8″ to 3/8″ for 3/4″ to 1-5/8″ buttonholes and from 1/8″ to 1/4″ for 1-3/4″ buttonhole. For overcoats, sack coats, etc. ¶ The machine is intended for making buttonholes in closely woven fabrics, the buttonhole being automatically cut before stitching. Makes buttonholes with double chain stitch (Singer Buttonhole Stitch) and lays a reinforcing cord under the edge of the flat purl. ¶ A change in length and shape is made by substituting a quick detachable Pattern Wheel, also Cutting Block and Knife. ¶ Unless otherwise ordered, this machine will be fitted to make a 13 inch eyelet-end buttonhole, with large size eye, without bar. ¶ Extra Pattern Wheels, Cutting Blocks and Knives, as listed below and on the following page, can be furnished for use on this variety of machine, for which additional charge will be made.

℔ Equipments for making eyelet-end buttonholes with medium size eye, without bar:

℔ Equipments for making eyelet-end buttonholes with large size eye, without bar:

℔ Equipments for making straight buttonholes :

℔ Equipments for making eyelet-end buttonholes with medium size eye, with adjustable taper bar:

℔ Equipments for making eyelet-end buttonholes with large size eye, with adjustable taper bar:

INDEX

SINGER 99W131 DESCRIPTION -INST

MEDIUM TRAVEL MACHINE

Machine 99w131 ( medium travel ) has a capacity to sew 5/8″ to 1-1/8″ and cuts straight end buttonholes or eyelet-end buttonholes with large or medium eye, without bar 5/8″ to 1-3/32″ and with bar 5/8” to 1″, the bar being adjustable from 1/8″ to 3/8″ for ” to 3/4″ button- holes, from 1/8″ to 1/4″ for 7/8″ buttonhole and with 1/8″ bar for 1″ buttonhole. for coats, vests, trousers, etc.¶ The machine is intended for making buttonholes in closely woven fabrics, the buttonhole being automatically cut before stitching. Makes buttonholes with double chain stitch (Singer Buttonhole Stitch) and lays a reinforcing cord under the edge of the flat purl. ¶ A change in length and shape is made by substituting a quick detachable Pattern Wheel, also Cutting Block and Knife. ¶ Unless otherwise ordered, fittings on this machine will make without bar 1 inch eyelet-end buttonhole with large size eye and inch straight buttonhole with stitching suspended at eye end. ¶ Extra Pattern Wheels, Cutting Blocks and Knives, as listed below and on the following page, can be furnished for use on this variety of machine, for which additional charge will be made.

℔ Equipments for making eyelet-end buttonholes with medium size eye, without bar:

℔ Equipments for making eyelet-end buttonholes with large size eye, without bar:

℔ Equipments for making straight buttonholes :

℔ Equipments for making straight buttonholes with or without rapid feed at eye end or eyelet-end with large size eye as desired.

*This size and style of buttonhole is made with combination pattern wheel, the cutting block and knife must be used for the particular style of buttonhole stitched. † See page 59.

℔ Equipments for making eyelet-end buttonholes with medium size eye, with adjustable taper bar:

℔ Equipments for making eyelet-end buttonholes with large size eye, with adjustable taper bar:

Note: ¶ Straight buttonholes with taper bar can be made with pattern wheels Nos. 256739 to and including 256745 by removing disengaging block 253444 and changing cutting block and knife.

INDEX

SINGER 99W130 DESCRIPTION -INST

LONG TRAVEL MACHINE

Machine 99w130 ( long travel ) has a capacity to sew 5/8″ to 1-5/8″ and cuts straight end buttonholes or eyelet-end buttonholes with large or medium eye without bar 5/8″ to 1-19/32″ and with bar 1/4″ to 1/8″, the bar being adjustable from 1/8″ to 3/8″ for 5/8″ to 1-1/4″ buttonholes, from1/8″ to 1/4″ for 1-3/8″ buttonhole and with 1/8″ bar for 1-1/4″ buttonhole. ¶ For coats, vests, trousers and clothing generally. ¶ The machine is intended for making buttonholes in closely woven fabrics, the buttonhole being automatically cut before stitching. ¶ Makes buttonholes with double chain stitch (Singer Buttonhole Stitch) and lays a reinforcing cord under the edge of the flat purl. ¶ A change in length and shape is made by substituting a quick detachable Pattern Wheel, also Cutting Block and Knife. ¶ Unless otherwise ordered, this machine will be fitted to make a 1 inch eyelet-end buttonhole with large size eye, without bar. ¶ Extra Pattern Wheels, Cutting Blocks and Knives, as listed below and on the following page, can be furnished for use on this variety of machine, for which additional charge will be made.

℔ Equipments for making eyelet-end buttonholes with medium size eye, without bar:

℔ Equipments for making eyelet-end buttonholes with large size eye, without bar:

℔ LONG TRAVEL MACHINE—Continued Equipments for making straight buttonholes :

℔ Equipments for making eyelet-end buttonholes with medium size eye, with adjustable taper bar:

℔ Equipments for making eyelet-end buttonholes with large size eye, with adjustable taper bar:

Note: ¶ Straight buttonholes with taper bar can be made with pattern wheels Nos. 256675 to and including 256689 by removing disengaging block 253444 and changing cutting block and knife. ¶ When preferred, the eyelet-end buttonholes produced on Machines 99w130 to 99w132 can have a square bar made on Machine 68-38.

INDEX

SINGER 99W index -INST

INSTRUCTION

FOR USING AND ADJUSTING

SINGER 99W  INSTRUCTION

INDEX

DESCRIPTION OF MACHINES

℔ 99W130 LONG TRAVEL MACHINE
℔ 99W131 LONG TRAVEL MACHINE
℔ 99W132 LONG TRAVEL MACHINE

BUTTONHOLES

℔ EQUIPMENTS FOR MAKING BUTTONHOLES
℔ STRAIGHT BUTTONHOLE WITH RAPID FEED AT EYE END
℔ TO ADJUST MACHINE FOR MAKING STRAIGHT OR EYELET-END BUTTONHOLES
℔ TO CHANGE STYLE AND LENGTH OF BUTTONHOLE
℔ TO CHANGE NUMBER OF STITCHES IN BUTTONHOLE
℔ TO CHANGE THE LENGTH OF EYELET END AND STRAIGHT BUTTON- HOLES AND LENGTH OF TAPER BAR

℔ STITCH REGULATING GEARS

BUTTONHOLE CUTTING MECHANISM

℔ BUTTONHOLE CUTTING KNIFE
℔ TO REGULATE PRESSURE ON BUTTONHOLE CUTTING KNIFE
℔ BUTTONHOLE CUTTING BLOCK
℔ TO REFACE BUTTONHOLE CUTTING BLOCK
℔ PROPER USE OF BUTTONHOLE CUTTING BLOCKS
℔ TO REPLACE THE BUTTONHOLE CUTTING DRIVING LOCK

CAUTION

CLAMP CARRYING MECHANISM

℔ TO ADJUST THE CLAMP CARRYING MECHANISM

CORD

℔ TO THREAD THE CORD

DIAGRAM SHOWING ORDER OF OPERATION OF MECHANISM

LOOPERS

℔ TO THREAD THE LOOPER
℔ TO REMOVE AND REPLACE LOOPER FRAME
℔ ALIGNMENT OF THE NEEDLE AND LOOPER FRAME
℔ TO ASSEMBLE LOOPER BRACKET TO MACHINE
℔ TO REPLACE AND TIME THREADED LOOPER
℔ TO REPLACE AND TIME NON-THREADED LOOPER
℔ TO TIME THE LOOPER DRIVING CRANK

LOOP RETAINERS

℔ TO REPLACE AND ADJUST RIGHT HAND LOOP RETAINER
℔ TO REPLACE AND ADJUST LEFT HAND LOOP RETAINER

MATERIAL

℔ TO DETERMINE THE PROPER MATERIAL TO USE FOR BUTTONHLOES WHICH ARE CUT BEFORE SEWING

NEEDLES

℔ TO ADJUST THE NEEDLE GUARD
℔ TO SET THE NEEDLE
℔ TO THREAD THE NEEDLE

NEEDLE VIBRATING MECHANISM

℔ TO ALIGN THE NEEDLE
℔ TO REGULATE THE CUTTING SPACE
℔ TO REGULATE THE WIDTH OF BIGHT

OILING

OPERATION OF MACHINE

PATTERN WHEEL

℔ TO REMOVE AND REPLACE PATTERN WHEEL

PULLEYS

℔ SHAFT PULLEYS

RAPID FEED MECHANISM

℔ TO REMOVE AND REPLACE CLUTCH ROLLERS

SAFETY LOCK

SETTING UP MACHINES

SPEED

SKIPPING OF STITCHES 63

TENSION

℔ TO ADJUST THE AUTOMATIC NEEDLE THREAD TENSION RELEASER
℔ TO REGULATE THE TENSIONS
℔ TO ADJUST THE LOOPER THREAD TENSION RELEASER

THREAD

THROAT PLATE

℔ TO REPLACE AND ADJUST THE THROAT PLATE

WORK CLAMPS

℔ TO ADJUST CLAMP CLOSING MECHANISM
℔ TO REGULATE THE AMOUNT OF SPREAD OF WORK CLAMPS
℔ TO REMOVE THE WORK CLAMP PLATES
℔ ADJUSTMENT OF CLAMP LOCKING MECHANISM